
Forward
I have to thank the gentlemen over at TonyMacOSX86 for all the awesome advice they give to the Hackintosh community. They are developers on the leading edge that really do their best to make the OS X Hackintosh users have a flawless interaction with their Hackintosh.
Prerequisites:
- Download your copy of El Capitan at the App Store
- Download most recent version of Clover boot loader (2.4k v4003 at time of writing)
- Have access to another Mac system (I used a VirtualBox running El Capitan)
- Have a 16gb flash drive
- Get coffee, ready your patience, and set aside some time to really do this without rush
Navigation
- Ready USB
- Clover Configuration
- Clover Installation
- Kexts and Plist
- Install El Capitan
- Post Install
- Editing Plist
Ready your USB
- Once El Capitan has downloaded, go ahead and mount it and move it to the applications folder.
- Open disk utility and select your USB device on the left hand side. Erase this as HSF+ (Mac Extended Journaled) with one partition with the GUID scheme.
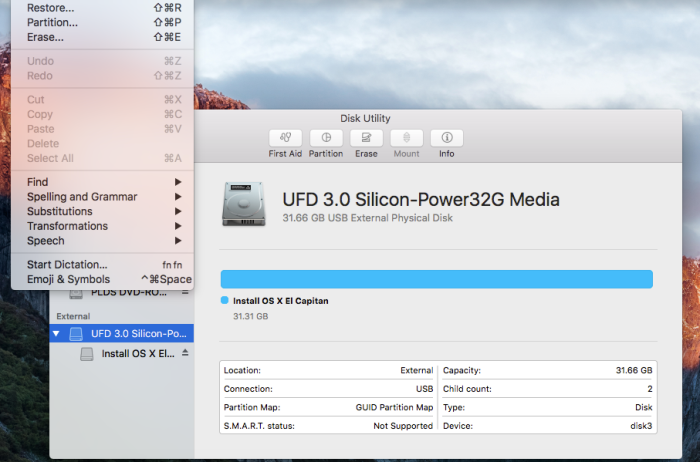
- Once the drive has been formatted, we must now make it a piece of bootable media using the Terminal App. Enter the code below into terminal to make the USB bootable.
-
sudo /Applications/Install\ OS\ X\ El\ Capitan.app/Contents/Resources/createinstallmedia –volume /Volumes/USB –applicationpath /Applications/Install\ OS\ X\ El\ Capitan.app –nointeraction
*Note – your device must be named what is after the “/Volumes/” line. Mine was USB.
- Once this finishes, you are now ready to move on to the Clover Configuration.
- Keep in mind that the USB you are making bootable will now be named El Capitan Install
Clover Configuration
Prerequisites:
- Download Clover’s latest version.
- Go ahead and grab the Kexts you will need from TonyMac (FakeSMC, your Ethernet kext, NullCPUPowerManagement Kext, HFSPlus.efi and the and PS2 Kexts if you need them.)
- Download the replacement config.plist best for your needs from below:
- “For desktop systems with Intel HD 4000, 4600, ATI/AMD Radeon HD 5xxx, 6xxx, 7xxx, R9 2xx, 3xx, NVIDIA GeForce 6xx, 7xx, 9xx, TITAN. Equivalent to Chimera/Chameleon GraphicsEnabler=No IGPEnabler=Yes.”
- “For desktop systems with older NVIDIA graphics cards such as GeForce 8xxx, 9xxx, 2xx, 4xx, 610, and 630. Equivalent to Chimera/Chameleon GraphicsEnabler=Yes.”
- “For desktop systems with older ATI graphics cards such as ATI Radeon 4xxx. Equivalent to Chimera/Chameleon GraphicsEnabler=Yes.”
- You will likely have to sign in to TonyMac in order to download these, as they are linked to TonyMacs download portal.
- I used the the second set of Kexts for older NVIDIA cards because I don’t have a newer card.
Start Clover Installation
- Open the Clover.pkg you chose to download
- Click Continue, Continue, Continue.
- Select “Change Destination” and pick your USB drive.
- Select “Customize”
- I chose a very standard Legacy Configuration to get this machine started as a very basic working machine.
- Select the following:


Configuring the Kexts and the new Plist
Plist:
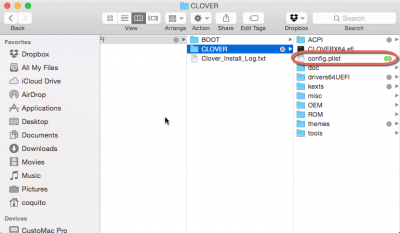
- Get your downloaded Plist.config and place it in the EFI/Clover directory. Remove the old Plist and replace this with the new one.
Kexts:
- Navigate to EFI/Clover/kexts and create a folder called 10.11 (there may be one already there, if so just use it.)
- Place your kexts (Ethernet, fakesmc, NullCPUPowerManagement, and PS2 if you need it)
- Now navigate to EFI/Clover/Drivers64UEFI and remove vboxHFS-64.efi and replace with HFSPlus.efi
Install OS X El Capitan
OS X El Capitan is a straight forward install when it comes down to the actual install. It should take around 45 minutes to completely configure the installation and do touch up work after the install.
- Start your machine and press the hotkey for boot options (F12 on a Dell).
- Select your USB and wait for the Clover boot loader to start.
- Once the boot loader starts, you will have to select the “Boot OS X Install from OS X Install OS X El Capitan” (this is the name of your USB device.)
- This will now launch the installer.
- Open the disk utility as soon as the installer opens and wipe your destination drive
- You may now continue with the installation and install on your destination drive.
- The install will complete and your computer may restart; it should do this a couple times.
- After the first install, boot from the USB again and select the installer once more.
- After it completes the second install, it will restart and you should boot into the USB one last time.
- Select “Boot OS X El Capitan” (Not the installer, the actual installed OS)
- OS X setup will now appear
Post Install
We must now set up the clover boot loader, your Plist configuration, and configure your kexts.
- Once the system has started, launch safari and install the latest version of Clover. (If no internet, put the files on another USB and plug it in)
- Configure Clover with these settings:

Kexts and Plist
- Navigate to Volumes/EFI/Clover/kexts
- Create a folder called 10.11 (may already be there, if so use it.)
- Place your kexts in this folder(Ethernet, fakesmc, NullCPUPowerManagement, and PS2 if you need it)
Configuring your Plist by Lexone
This is a guide that was designed by Leone for Yosemite – but it applies directly to El Capitan since it is just hardware configuration.
Editing config.plist file for USB:
Pre-requisites:
One of the downloaded config.plist files (start with Standard one)
View attachment imessage_debug.zip
Clover Configurator (recommended version 2953 or later)
- Download config.plist file
- Open Clover Configurator
- File>Import Configuration>select downloaded config.plist
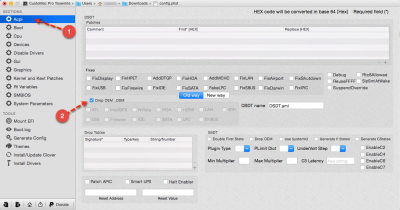
- Click Acpi (only if using DSDT, if no DSDT skip to Step 4.)
- Select checkbox for Drop OEM_DSM
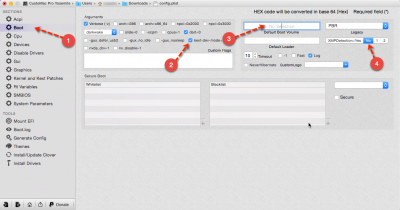
- Click Boot
- Keep defaults and check box for kext-dev-mode=1
- Remove “Default Boot Volume” text or replace with your boot volume name
- Set XMP Detect to No
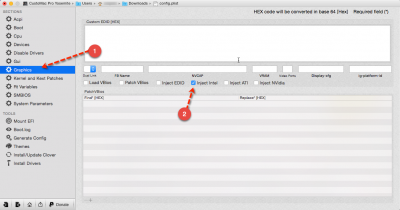
- Click Graphics
- If using Intel IGFX/IGPU, accept the default (checked) otherwise uncheck “Inject Intel”
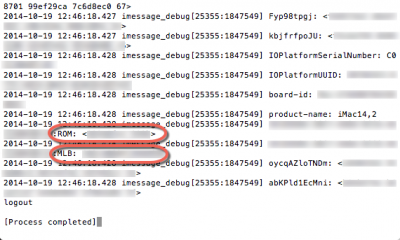
- Run iMessage_Debug and keep terminal window open
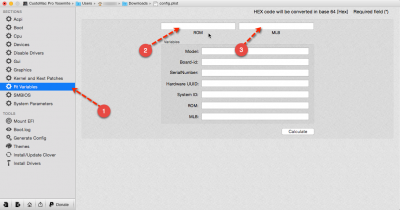
- Click Rt Variables in Clover Configurator
- Enter the ROM and MLB values from iMessage debug (Do NOT click Calculate)
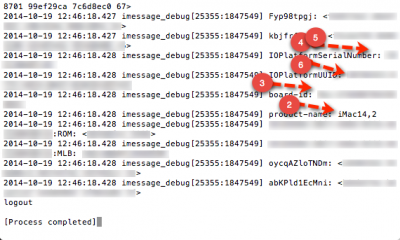
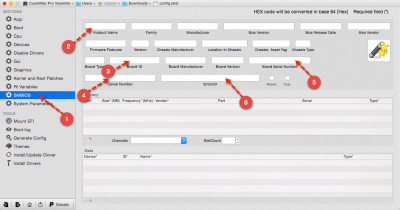
- Click SMBIOS
- Enter the Values in the following fields from iMessage debug output
- Close Clover Configurator
- Save
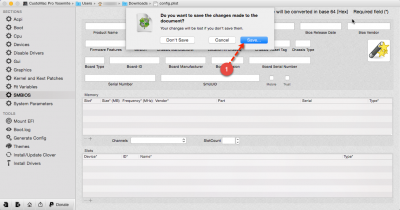
- Place edited config file in /EFI/EFI/CLOVER directory

So happy you did not use MultiBeast 😀
LikeLiked by 1 person
Multibeast is ok sometimes, but I’ve found that on my last 3 Dell systems, it has caused some issues. I really love this system the way it is now!
LikeLike
Did audio work for you OOTB?
LikeLiked by 2 people
I had to find a proper kext file. I don’t believe I had it working. I’ve since changed this box to a multi miner for crypto currency.
LikeLike